Grade 6-8 hands-on curriculum
Compiled by Dan Harper, v. 1.0
This curriculum refers to the participants as “teens”
Copyright (c) 2014-2022 Dan Harper
Back to the main Ecojustice page
Standard class lesson plan
Session plans
Multiple sessions (activities which may last for more than one week)
Games
Many of the session plans on this page are based on material in the Ecojustice Outdoors Book. Copies of this book may be obtained by contacting the curriculum author. However, note that this book was written specifically for the San Francisco Bay Area. In addition to outdoors activities, the Ecojustice Outdoors Book has sections on Ecojustice Elders, information on threats to Earth’s life-supporting systems, and other material about the justice side of ecojustice.
Every lesson should include something about justice. At a minimum, you should read an ecojustice poem at the start of every class (see Standard Class Lesson Plan below). More information about ecojustice poetry may be obtained from the curriculum author.
Relate each session to one of the Ecojustice Elders. For example, maybe you could relate Session 1: Solar Cooking to Wangari Maathai’s justice work. Maathai was concerned about how women are affected by ecological problems. In many parts of the world, cooking remains the primary responsibility of women. In some cultures, giving women access to solar cookers might help them lower their dependence on burning wood for cooking. This could mean less work for women, plus less exposure to smoke for women, plus less demand for cutting down trees. Many of the sessions have suggestions for a relevant Ecojustice Elder.
You can also ask the teens to hep make connections between a lesson and one of the Ecojustice Elders. Session 2: Fall Gardening — hey, didn’t Henry Thoreau keep a garden? Or maybe instead you’d say — what about Cesar Chavez, who worked with farmworkers?
Standard Class Lesson Plan
Light chalice: 2 min.
Use these chalice lighting words:
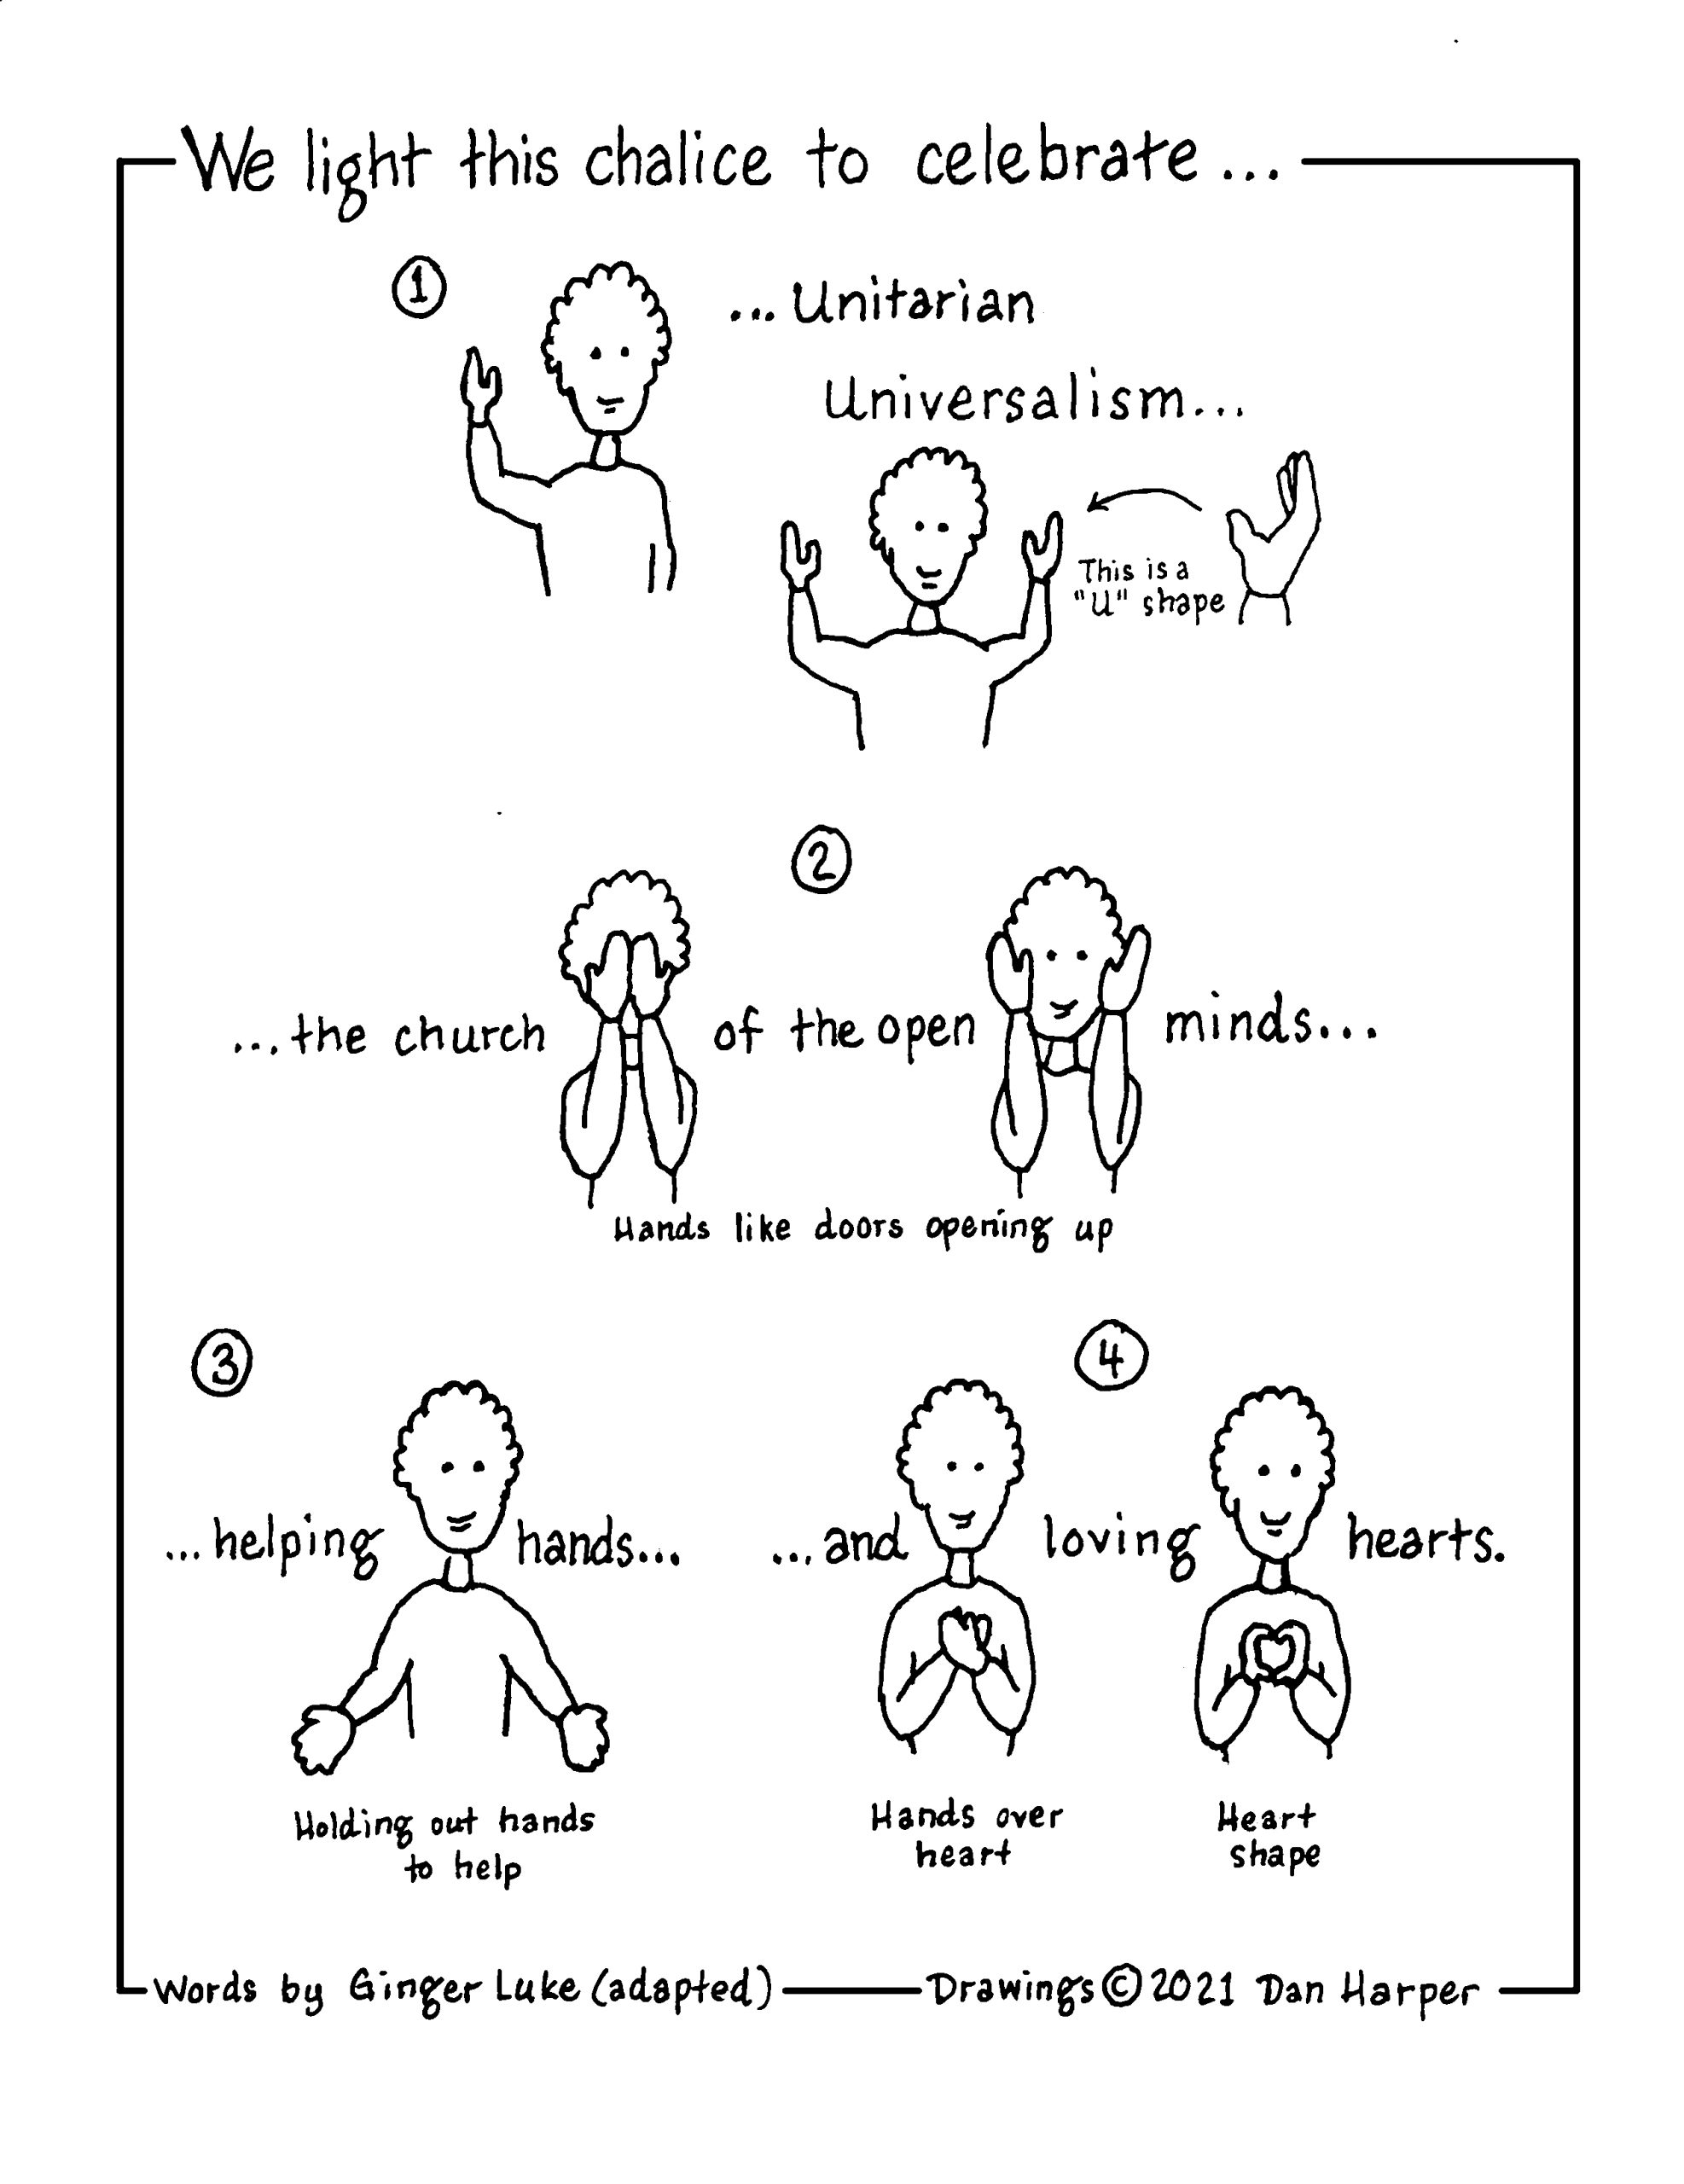
We light this chalice to celebrate
Unitarian Universalism
The church of the open mind,
Helping hands,
And loving hearts.
Reading: 3 min.
Read an ecojustice poem of your choice. One good source for ecojustice poetry is: Ghost Fishing: An Ecojustice Poetry Anthology.(Univ. of Georgia Press, 2018), ed. Melissa Tucker. See also the Jan., 2016, issue of Poetry magazine.
As an alternative to reading a poem, introduce one of the Ecojustice Elders.
Check-in: 5-10 min.
Go around the circle, everyone can say a good thing and a bad thing that happened in the past week (or two good things, or two bad things).
Ecojustice Elder: 5 min.
Talk about one of the Ecojustice Elders. If possible, explain how they relate to today’s main activity.
Main Activity: 30-45 min.
Do the main activity for the class, as outlined below.
Clean-up & Closing Benediction: 5-10 min.
Be sure to allow time for clean-up before the end of class. This is especially important for some sessions, e.g., cooking.
When clean-up is complete, say the unison benediction together:
Go out into the world in peace
Be of good courage
Hold fast to what is good
Return no one evil for evil
Strengthen the faint-hearted
Support the weak
Help the suffering
Rejoice in beauty
Speak love with word and deed
Honor all beings.
Session Plans
Session 1: Solar cooking
Materials:
Commercial solar over (optional)
large size pizza boxes for every teen, or any cardboard box about 16 inches square, and 2-4 inches deep
Several feet of aluminum foil
black construction paper
clear plastic oven wrap
masking tape
black water-based nontoxic poster paint
2 feet of string
clear plastic tape
Note: Avoid materials that you think might become toxic when heated.
Tools needed:
scissors (teachers may also want to have a knife on hand to cut cardboard). ruler
marker
paint brushes, can of water
Prep:
We recommend you make one of the solar ovens yourself before trying it in class.
Session plan:
See the Standard Lesson Plan for the opening, and the closing.
This class should be done before the autumnal equinox. You want the sun to be fairly high in the sky, and outdoor temperatures need to be fairly warm.
You can use a commercial solar oven to make solar s’mores. And/or use the PDF below to make your own cardboard box solar oven.

Session 2: Gardening
Ecojustice Elder:
Cesar Chavez showed how commercially grown food can exploit farmworkers. By growing our own food, we experience solidarity with farmworkers, and we can empathize with their desire for safe working conditions.
Tools:
Enough gardening tools for all the teens to be able to use something
Prep:
Check the garden beds, make sure irrigation is working (as needed), make sure there’s something for the teens to do.
If your garden area has rain barrels, check their status. If there’s water in them, plan to show the teens how to access that water.
Session Plan:
See the Standard Lesson Plan for the opening, and the closing.
Ideally, Ecojustice class will have one or more gardens to tend.
At the beginning of the school year, one full class should be devoted to end-of-season tasks such as cleaning out crops that have gone by, etc.
If the class does not have a garden yet, or if the class is developing a new garden, several sessions can be devoted to digging the garden, maybe building raised beds, and planting winter crops or cover crops.
As we developed Ecojustice Class, we noticed there were some years when the teens were very interested in gardening, other years when they weren’t. If this year’s class likes gardening, plan to add more year-round gardening activities including:
starting seeds indoors in flats (make sure you have light and moisture)
digging new garden beds
adding or expanding raised beds
creating cold frames or cloches
Session 3: Make Leaf Packs
Ecojustice Elder:
Rachel Carson was concerned about water pollution. Leaf packs provide a way to monitor the health of streams by seeing what organisms can live in the water.
Prep:
Read about the project on the Leaf Pack Network website.
Learn about your local water shed, and figure out engaging ways to communicate basic facts about it to the teens.
Materials:
Collect materials as described on the website
Session plan:
See the Standard Lesson Plan for the opening, and the closing.
Leaf packs are a way to monitor the health of local freshwater ecosystems. See the Leaf Pack Network website for full instructions on making and monitoring leaf packs.
If your class does not meet near a river, creek, or stream, you have a couple of options: A. Make the leaf packs in your class area, then take a field trip to the stream to place the leaf packs; or B. Class makes the leaf packs and the teachers place them in a stream.
Ideally, leaf packs will be placed in your local watershed. So this is a chance to learn something about your local watershed. Here are two sample resources for teaching about the Adobe Creek watershed in Palo Alto. First, a sketch map of the historic course of Adobe Creek prior to European contact. The sketch map also shows pre-contact villages of the indigenous Puchon Ohlone people, and pre-contact vegetation types:
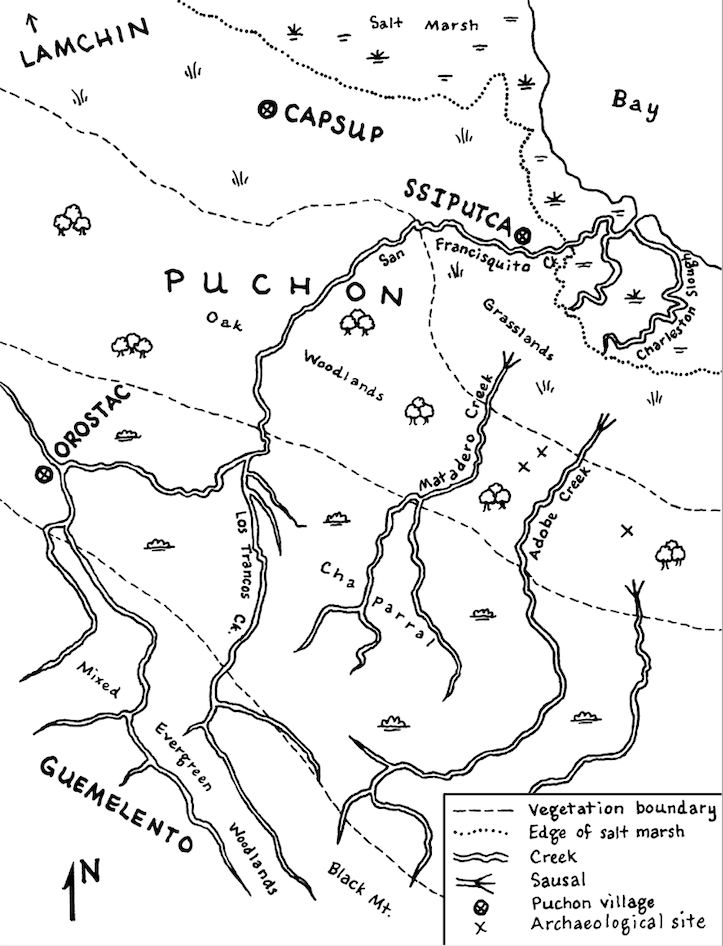
This map can be compared to modern maps, to see how the land use in the watershed has changed.
Second, a song that gives the history of the Adobe Creek watershed. You don’t have to write a song about your own watershed (unless you’re a songwriter), but you could probably come up with some other arts-based way to introduce the watershed to your class, e.g., a photo collage, a short video, etc.

Third, you can use the “Know Your Watershed Quiz” to learn about your area. The quiz below is extraordinarily difficult. You may want to shorten it, and pull out the easier, more basic questions. You could also limit the question to just the first section on “Water.”

Session 4: Look at invertebrates in leaf packs
Ecojustice Elder:
Rachel Carson was concerned about water pollution. Leaf packs provide a way to monitor the health of streams by seeing what organisms can live in the water.
Session Plan:
See the Standard Lesson Plan for the opening, and the closing.
After 3 weeks in the water, retrieve the leaf packs and bring them to class so you can look for invertebrates.
See the Leaf Pack Network website for full instructions identifying invertebrates. You probably won’t have time to do the full analysis required to meet the requirements for reporting your results to the Leaf Pack Network, but that’s fine. We’re doing this, not as a citizen science project, but more as a way to introduce our watershed.
Session 5: Knife Safety and Whittling
Ecojustice Elder:
Ishi taught Anglos his skills in using woods tools.
Tools:
We find the Victorinox Bantam knife is relatively affordable, while offering good quality.
Prep:
Make sure all the pocket knives are sharp. A sharp knife is a safe knife.
Make sure YOU know how to use a pocket knife safely. If you don’t, find someone who does!
Materials:
We’ve tried buying expensive blocks of carving wood. But honestly, what the teens like best is whittling sticks they pick up on the ground.
Session Plan:
See the Standard Lesson Plan for the opening, and the closing.
Use the PDF below to teach knife safety, and basic whittling.
Setting up the class: We have found from experience that everyone should be sitting in a chair at a table. Space class members out about 4 feet, so they can’t swing their knife and cut someone. Having them whittle at a table means that their legs (including their femoral arteries) are protected by the table.
We recommend the pocket knife safety guidelines from the Girl Scouts of Maine.

6: Cook Scrambled Eggs on a Camp Stove
Ecojustice Elder:
Henry Thoreau liked to cook outdoors when he lived at Walden Pond.
Materials:
Eggs (2 for every teen, plus some for mistakes)
Butter
Salt
Tools:
Camp stoves, 1 per teacher works best
Extra propane (trust us, you don’t want to run out of propane in the middle of a class)
For cooking:
Frying pans
Spatulas
Mixing bowls
Whisk to beat eggs
Oven mitts
Matches
Forks and plates to eat from
For clean-up:
Three tubs, one with warm soapy water, one with warm rinse water, one for cleaned dishes
Sponges or dish rags
Steel wool
etc.
Prep:
Make sure you know how to operate the stove yourself. If you’ve never cooked on a camp stove before, you should probably learn how before teaching the teens….
Session Plan:
See the Standard Lesson Plan for the opening, and the closing.
Cooking on a camp stove is a favorite activity in Ecojustice Camp and Ecojustice Class. The following excerpt from the Ecojustice Outdoors Book outlines some of the different kinds of camp stoves you can use:

The easiest plan is to use a propane camp stove, such as a Coleman two-burner propane stove. Two-burner stoves are more stable than smaller backpacking stoves, and therefore safer.
When we cook on two-burner camp stoves, we set up three stations.
Station 1 has the camp stove, eggs, bowl to break eggs into, salt, butter, a whisk or fork to beat the eggs, frying pan, spatula, ovens mitts, matches. More mature teens should learn how to safely light the stove, and adjust the flame height. For less mature teens, teachers will want to take care of these things.
Station 2 is where you can eat your eggs. Forks and napkins are at this station.
Station 3 is the dishwashing station. We put out a tub of very warm (not hot) soapy water and cleaning implements. Next is a tub of very warm (not hot) rinse water. Then a clean tray in which to place cleaned dishes. Washing the dishes is often the most popular part of the activity (it’s kinda like water play for teens). N.B.: Your city/town health department will probably require you to sanitize the dishes anyway, but it’s good to get the teens in the habit of cleaning up.
Session 7: Learn How To Build Fires in a Firepit
Ecojustice Elder:
Ishi taught Anglos his outdoors skills, including fire building.
Tools:
One or more firepits
Hose with running water
Materials:
Tinder (e.g., scrap paper)
Kindling wood ranging in size from the diameter of your pinkie up to a couple of inches thick
Fuel wood
Matches
Session Plan:
See the Standard Lesson Plan for the opening, and the closing.
Use the attached PDF to teach the teens how to build fires.

Building fires is typically one of the favorite activities among the teens. We finally went out and got a second firepit so that the teens didn’t have to wait so long for another turn. We found one for free on NextDoor.
Session 8: Emergency Backpacks
Prep:
Check over your own go-bag, and see how it compares with the FEMA checklist below.
And if you don’t have a go-bag, before you say, “Gosh, that will takes too much time.”… Don’t put it off any longer, make up your go-bag NOW. You may need it tomorrow!
Session Plan:
See the Standard Lesson Plan for the opening, and the closing.
You may be wondering what emergency preparedness is doing in Ecojustice Class. Ecojustice Class combines scouting-type hands-on activities with an understanding of environmental injustice. Emergency preparedness touches on both of these.
One the one hand, most scouting-type programs have some emergency preparedness training. After all, in an emergency, when the power goes out or the water main breaks,, or a tornado or earthquake destroys you house, you may need all your scouting-type skills — how to build a fire, how to purify water, how to put up a tent, etc.
On the other hand, in a time of worsening climate change, we’re going to be experiencing more severe weather events that bring on emergencies.
And on the other other hand, what you might go through during a weather emergency is pretty much what environmental refugees are going through. The difference is, in North America we’re likely to get relief from our weather emergencies within a few months, or within a few years for severe emergencies like Hurricane Katrina. Many teens these days would not be surprised if they became environmental refugees at some point in their lives. If that ever happens, we’re empowering them with skills that could help them take charge of their life.
One final thought about why emergency preparedness belongs in Ecojustice Class. One of the things we try to teach the teens is resilience — really practical hands-on resilience as well as mental resilience. Emergency preparedness is really all about resilience.
OK, enough preaching. Here’s the lesson:
Look over the PDF on emergency “go-bags.” One or both teachers should make up their own emergency go-bag. It’s also great if you can get someone to visit your class who has had Community Emergency Response Training (CERT).
Bring your go-bag to class. Ask the teens what emergencies might force them to evacuate their house. Depending on where you live, answers might include: earthquakes; wildfires; hurricanes; tornadoes; floods; etc. Also talk about what happens when the power goes out (no heat, no refrigeration, no lights, etc.).
(In northern California where this class was developed, the two big things we worry about are wildfires and earthquakes. We also have to deal with rolling power outages when power is shut of during “red-flag” weather, when there’s an extreme risk of wildfire. In case of an earthquake, you might have to evacuate your house due to earthquake damage. In the case of wildfire, you might have 30 minutes to evacuate your house and leave the area. So your go-bag should have things you’d want if you have to spend one or more nights in an evacuation center, and/or if you have to camp out outdoors.)
Now unpack your go-bag for the teens. Item by item, show them everything that’s in it, and explain why it’s there. Have them think about how their go-bag would differ from yours. If you want, you can photocopy the handout and give them copies to look at while you unpack.
If you’re going to go on the field trip next class, go over basics like comfy footwear, dress for the weather, etc.
Session 9: Field Trip
Ecojustice Elder:
Harriet Tubman used her skills as a naturalist to help people escape from slavery.
Prep:
Arrange transportation to the field trip site.
Visit the field trip site yourself. What will interest active teens? (Hint: You may decided to just let them explore.)
Session Plan:
See the Standard Lesson Plan for the opening, and the closing. (You can do the opening and closing at the field trip site, or before and after driving there and back — your choice.)
Schedule a field trip to a location in your local watershed. You want some place that’s relatively close to your regular meeting place so it doesn’t require a long drive.
The goal of the field trip is mostly to get outdoors and have a good time. If the weather is poor, put off the field trip until you can have a good time.
A secondary goal of the field trip is to see something significant in your local watershed. For example, this class was developed for the UU Church of Palo Alto, Calif., on the Adobe Creek watershed. Adobe Creek drains into San Francisco Bay about three miles from the church. So a good field trip for us would be heading down to the end of San Antonio Rd., and walking out the Adobe Creek Trail. Here’s Audubon Society’s winter trail guide for Adobe Creek Trail.
Session 10: Knots
Materials:
We like to use 1/4 inch diameter cotton clothes line for knot tying practice. It’s relatively inexpensive, it’s easy on your hands (unlike manila rope), it doesn’t slip (unlike nylon and polyester rope). You’ll want 2 – 10 foot lengths for each teen.
You’ll also want some poles to tie things too. Broom handles work well.
Prep:
Learn how to tie some knots yourself. If you don’t know how to tie knots, find someone who does. Teens enjoy meeting adults who can tie some of the more exotic knots, like monkey’s fists.
Session Plan:
See the Standard Lesson Plan for the opening, and the closing.
Show the teens how to tie some of the knots in the Knots chapter in the Ecojustice Outdoors Book.
We usually demonstrate a couple of the easy knots, and let them practice those for a bit. Typically, teens in the class will learn at different rates, so some will still be learning one knot while others come to you to be taught a new knot.
Session 11: Bees
Ecojustice Elder:
Bee populations worldwide are declining. There are many causes contributing to declining bee populations, including toxics in the environment. So today’s Ecojustice Elder is Rachel Carson, who fought against toxics in the environment.
Materials:
For the bee watering stations, see this website
For bee houses, find instructions for bees that live in your area. For northern California, we like these instructions from UC Davis.
Prep:
It’s a good idea to build them yourself before building them with the teens.
Tools:
Drills
Tools to cut bamboo or other tubes (probably saws)
Safety gear (eye protection, ear protection)
Session plan:
See the Standard Lesson Plan for the opening, and the closing.
Bee populations around the world are in decline. This is seriously worrying, because bees are some of the most important pollinators. The University of California Davis has information on the decline of California wild bees. In addition, UC Davis researchers have found that toxics in the environment are contributing to declining populations. So anything we can do to support bees is A Good Thing.
For the bee houses, you’ll probably want to make both the type that’s made up of little tubes stacked up, and the type where you drill holes in blocks of wood.
If you’re using a power drill, one adult will have to supervise this. It’s possible to have one adult supervise two drilling stations side by side.
The other adult can lead the teens in making bee watering stations. Some teens really get lost in a fantasy world as they make bee watering stations — which is a good thing, and to be encouraged.
Some teens will want to set up their bee watering stations immediately, and watch to see if bees come. Make sure the teens know that most bees are seasonal. Ideally, you’ll do this session in a season when bees are actually out and about.
Session 12: Rocket stoves
Ecojustice Elder:
Rocket stoves were designed to help make more efficient use of wood as a fuel, and also designed to produce less harmful smoke. In many places in the world, women do all the cooking, and if they have to cook over wood fires the smoke from those fires can have an adverse effect on their health. In addition, as population increases, and as the effets of global climate change are felt, women may have to travel further and further to gather an adequate supply of wood for fuel; by using a more efficient stove, the women can spend less time gathering fuel. Today’s Ecojustice Elder is Wangari Maathai, because she saw how women are affected by environmental problems.
Materials:
Purchase the materials listed in the PDF “How To Make Concrete Block Rocket Stoves” (total cost about ten dollars)
Prep:
Set up the rocket stove
Now learn how to use it. Light it. Keep the fire going for a while. Put it out according to the instructions.
Session Plan:
See the Standard Lesson Plan for the opening, and the closing.
We usually assemble the rocket stove before the class, then spend the class learning how to light it, how to keep it going, and then cooking over it. However, we have also had enough concrete blocks for two rocket stoves, have one pre-assembled, then while some teens are learning how to use the rocket stove the others are learning how to assemble a rocket stove.
Background:
Rocket stoves were developed by Dr. Larry Winiarski and others for use in developing areas where biomass is the primary fuel source for cooking. Rocket stoves make much more efficient use of fuel, and produce less harmful smoke and emissions. Winiarski shows how to make a rocket stove for use in developing countries in this video. Rocket Stoves can also be used in disaster response, as in this video.
Overview of Rocket Stoves:

How To Make Concrete Block Rocket Stoves:

Using Concrete Block Rocket Stoves:
Concrete block rocket stoves can be fussy to use!
(A) The concrete is not a particularly good insulator, so often the stoves don’t work well until they’ve had a fire burning in them for 15 minutes or so. (B) The wood burns pretty quickly, so you have to tend the fire constantly, feeding and pushing the sticks in to the combustion chamber so the fire doesn’t die out. (C) Rocket stoves are like Goldilocks. They don’t like too much wood. They don’t like too little wood. They like just the right amount. For the typical concrete block rocket stove, “just right” is 3 sticks about 1-2 inches in diameter (though that can vary depending on how easily the wood burns).
Because they’re fussy, we’ve learned to have one teen tending the fire (sitting on the ground or kneeling), while another teen cooks. That’s what you see in the photo above. Having one teen both tend the fire and cook doesn’t work well.
We’ve also learned that you want to have extra wood stacked next to the stove. When you need a fresh piece of wood, usually you need it RIGHT NOW, and you don’t have time to dash over to a wood pile to get it.
To put out the fire, DO NOT pour water directly into the stove. If you do, you’re likely to crack the concrete blocks. Instead, get a bucket of water, and hold the bucket in front of where you feed fuel into the rocket stove. Pull out any fuel that can be handled safely, and dunk it in the water. Then use a long stick to carefully rake out the burning coals into the bucket of water.
Rocket stove photos

Above: A newly assembled rocket stove all ready to light. Notice the wood stacked conveniently below where you feed the fire.
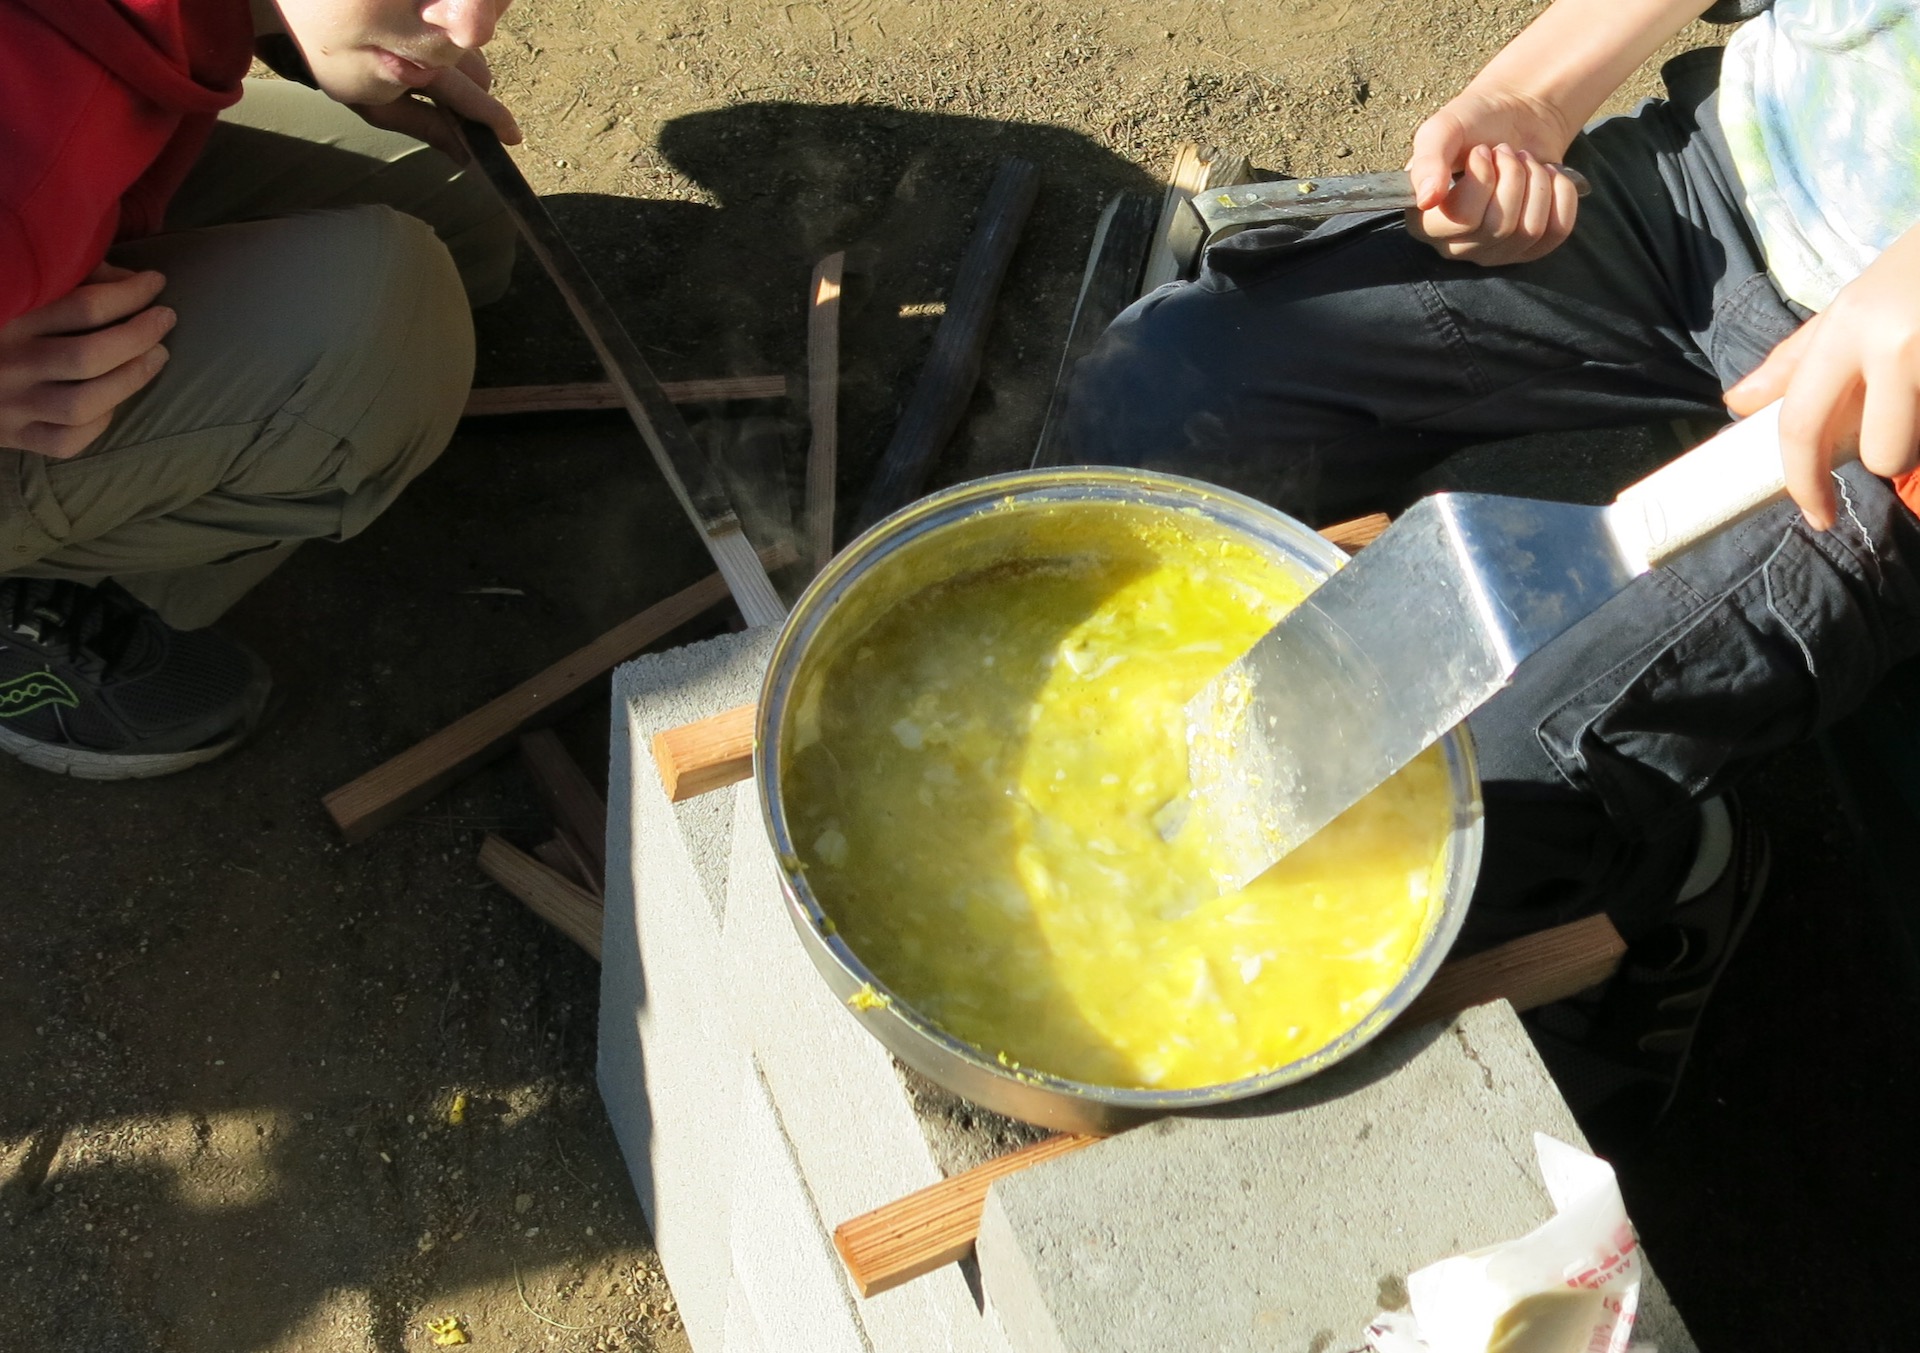
Above: Cooking on the rocket stove. Notice how one person is cooking, and the other person is feeding the fire.
Session 13: Water purification
Ecojustice Elders:
Learn about the Other Ecojustice Elders who have worked on water issues: Catherine Coleman Flowers OR Esther Gulick, Sylvia McLaughlin, and Kay Kerr.
Tools/Materials:
Backpacking water purifier (filter and pump type)
Water purification tablets
Bleach, water dropper
Safety glasses
Water bottles
Campstove and pan for boiling water
Water
Cups (for sampling purified water)
Prep:
Read the instructions on the water purification tablets you got. Some types of tablets require an extended waiting period. If so, use the water purification tablets in the water far enough in advance so that the teens can safely sample it during class. You’ll also want another water bottle so you can show them how to dissolve the water purification tablets.
If you’re unfamiliar using a water purifier (filter w/pump), practice using it. Read the instructions so you know how to safely store your water purifier. E.g., some water purifiers require that you pump a dilute bleach solution through it before storing. If that’s true of yours, you’ll want to show the teens how that’s done.
Make sure you know how to boil water on the camp stove.
If you’ve never purified water using bleach, practice doing so. Make sure you get the measurements correct.
Session plan:
See the Standard Lesson Plan for the opening, and the closing.
Demonstrate each of the water purification methods. As possible (given the class size), let the teens try each of the methods themselves. Make sure the teens wear safety glasses while using bleach.

Session 14: Trail Signs
Ecojustice Elder:
Prep:
Using the handout below, set up a trail around your campus. If you have a small church campus, then set up a trail in a nearby park, or on safe city streets. Depending on how many teachers and how many teens you have, you may want to split the class into two or more groups. If so, you may want to set up more than one trail — or plan to send multiple groups out on your trail at staggered intervals.
Session Plan:
See the Standard Lesson Plan for the opening, and the closing.
Show the teens the handout. Show them the starting point for the trail you’ve set up. Accompany them as they follow your trail, giving hints only as needed.
Now that they understand how trail signs work, have each group make their own trail. Then trade off, so different groups follow each other’s trails.

Session 15: Games of Stealth
Ecojustice Elder:
Harriet Tubman was a skilled naturalist and outdoorsperson who could sneak up on animals when she needed to hunt them for food. In addition, her skills in stealth helped her lead enslaved persons to freedom.
Materials:
Blindfolds, 3 large foam balls
Session Plan:
See the Standard Lesson Plan for the opening, and the closing.
Go over the reasons why you want to learn stealth (see handout below).
Then play one or both stealth games.
If weather permits, you can try going outdoors and trying to get close to animals. How close can you get to a squirrel?

Session 16: How To Set Up Tents
Materials:
Tents, approx. one tent for every 2-3 teens in the class
Ground cloths or “tent footprints”
Prep:
Find a nice grassy area where you can set up the tents. This will protect the tent floor.
If a nice grassy area isn’t available, I’ve done this activity in a paved parking lot by putting down large painter’s drop cloths to protect the tent floor. (We had to use self-supporting tents, of course, because there was no way to drive tent pegs into the paving.)
Session plan:
See the Standard Lesson Plan for the opening, and the closing.
In preparation for an overnight camping trip, have the teens learn how to set up tents in teams of 2-3. Then have them pack the tents up again.
Now have a competition. Who can set up their tent fastest?
Make sure the teens know the Prime Rules for Tents:
No Food in Your Tent!
Once your tent is set up, never bring food inside it. Never, not even for an instant. Food can leave an odor that attracts animals. Believe me, you don’t want to be awakened in the middle of the night by a couple of hungry raccoons trying to get in your tent. So—no food in the tent, not ever.
No Shoes in Your Tent!
Never wear your shoes in your tent. You don’t want to bring dirt and sand inside the tent. Leave shoes at the tent door. Keep the inside of the tent clean.
Session 17: How To Pack a Pack, and Planning for Camping
Prep:
Teachers pack their own packs and bring them to class. Use the packing list below — or if you have other preferred packing checklists, make your own handout and pack your pack according to your handout.
Print out the standard checklist for packing, one for each teen.
Have ideas ready for easy food to cook.
Session Plan:
See the Standard Lesson Plan for the opening, and the closing.
In preparation for an overnight camping trip, learn how to pack your pack. The teachers should pack their pack, using a standard checklist. A PDF of the checklist we use is below — you may have to alter this for your climate/season.
Bring in your packed pack, unpack it for the teens, then show them how it all goes together again. Go over the packing list. Help the teens come up with alternatives if they don’t have everything on the list.
In this class, you’ll also want to plan out the food. And decide who’s going to do the cooking (we like to have the teens cook, while the adults help out). And go over any rules you may have (e.g., lights out at 9:30 p.m. so you can get up early, etc.).
See the “Logistics” section in Session 18.

Session 18: Overnight Camping Trip
Go on the overnight camping trip!
Logistics:
Parents like to have a couple of months advance notice for overnight trips. Ideally, you’ll set the date for the overnight at the beginning of the school year, and let the parents know then.
Make sure you reserve a group campsite well in advance. Group campsites often fill up 6 months to a year in advance.
A month in advance, you’ll want to arrange to have enough adults along. A 1:5 ratio is ideal for a campout, esp. where some of the teens may never have camped before.
Make sure you comply with the congregation’s safety policy regarding tent assignments. We have found that it’s best to have many smaller tents, so you don’t have to deal with the question of whether to have boys in one tent and girls in another (a requirement of some insurance carriers; but what about other genders? and do we have to separate people with same sex attraction? then what about bisexuals?). With smaller tents that only hold 2 teens, you can ask parents to decide who gets to share a tent with whom.
Session 19: Native Plants
Find an expert to give you a tour of a nearby native plants garden.
Session 20: Spring Gardening
Ecojustice Elder:
Cesar Chavez showed how commercially grown food can exploit farmworkers. By growing our own food, we experience solidarity with farmworkers, and we can empathize with their desire for safe working conditions.
Session Plan:
Spring Gardening activities include:
turning over the soil, turning under a cover crop if you planted one
preparing the soils for planting
transplanting seedlings
planting seeds
Session 21: Invertebrates Day
Ecojustice Elder:
Henry Thoreau saw there was beauty throughout the natural world. His close observations of the natural world make use realize that all of Nature is sacred.
Here’s an observation of invertebrates from Thoreau’s Journal, June 2, 1855: “I see in the meadow-grass a fine cobweb or spider’s nest three or four inches in diameter and, within it, on two twigs, two collections of little yellowish spiders containing a thousand or more, about half as big as a pin-head, like tiny fruit-buds or kernels clustered on the twig. One of the clusters disperses when I stoop over it and spreads over the nest on the fine lines.”
Prep:
Ideally, find someone in your congregation who’s something of an expert on invertebrates. Invite them to help you find invertebrates outdoors on your campus. If you can’t find an expert on invertebrates, the handout below will give you some ideas of how to locate invertebrates.
Materials:
White cloth or white tray
Something to tap with
Boards to lay down
Plastic cups for pitfall traps
Trowel
Finding Invertebrates by Stealth
Watch flower gardens for butterflies and bees. Butterflies may fly away if they see you. Use the stealth skills you have learned — freeze when you see a butterfly so you don’t scare it away.
An extra challenge for teens who have smartphones: get close enough to a butterfly or bee to take its photo.
Tapping for Invertebrates
Many insects like to rest on the undersides of leaves. Spread a white cloth, or a large light-colored tray, under a leafy branch. Tap the branch gently, causing insects to fall onto the sheet or tray. After you’ve finished looking at the insects, release them carefully at the base of the tree or shrub where you found them.
One of the reasons leaf blowers are such a bad idea is that they blow insects from their resting places, exposing them to predators, sun, or other threats. There is some thought that one minor but important contributor to “insect apocalypse” — the steep decline in insect populations worldwide — is the damage done by leaf blowers. Leaf blowers also contribute to noise pollution and air pollution. Even electric leaf blowers contribute to air pollution, by stirring up mold, dust, etc., and spreading the kind of fine particles that settle deep in your lungs. In addition, low-wage workers who use leaf blowers are often not given adequate protection (hearing protection and dust masks), thus potentially causing health problems. And worst of all — there’s no reason to use leaf blowers. No one needs a perfectly clean yard, and if leaves or debris needs to be removed it can be raked or swept.
For all these reasons — but especially to help stop insect apocalypse — No More Leaf Blowers!
Today’s Ecojustice Elder could be Cesar Chavez who helped protect farmworkers. Today, we need to protect low wage gardeners from the health hazards of leaf blowers.
Damp Boards on Ground
For slugs and worms and other invertebrates that like cool, dark places, dampen a place on the ground and place a piece of plywood there. Check regularly to see what has crawled under the cover.
Unlike the pitfall trap below, you can leave the damp board down as long as you want.
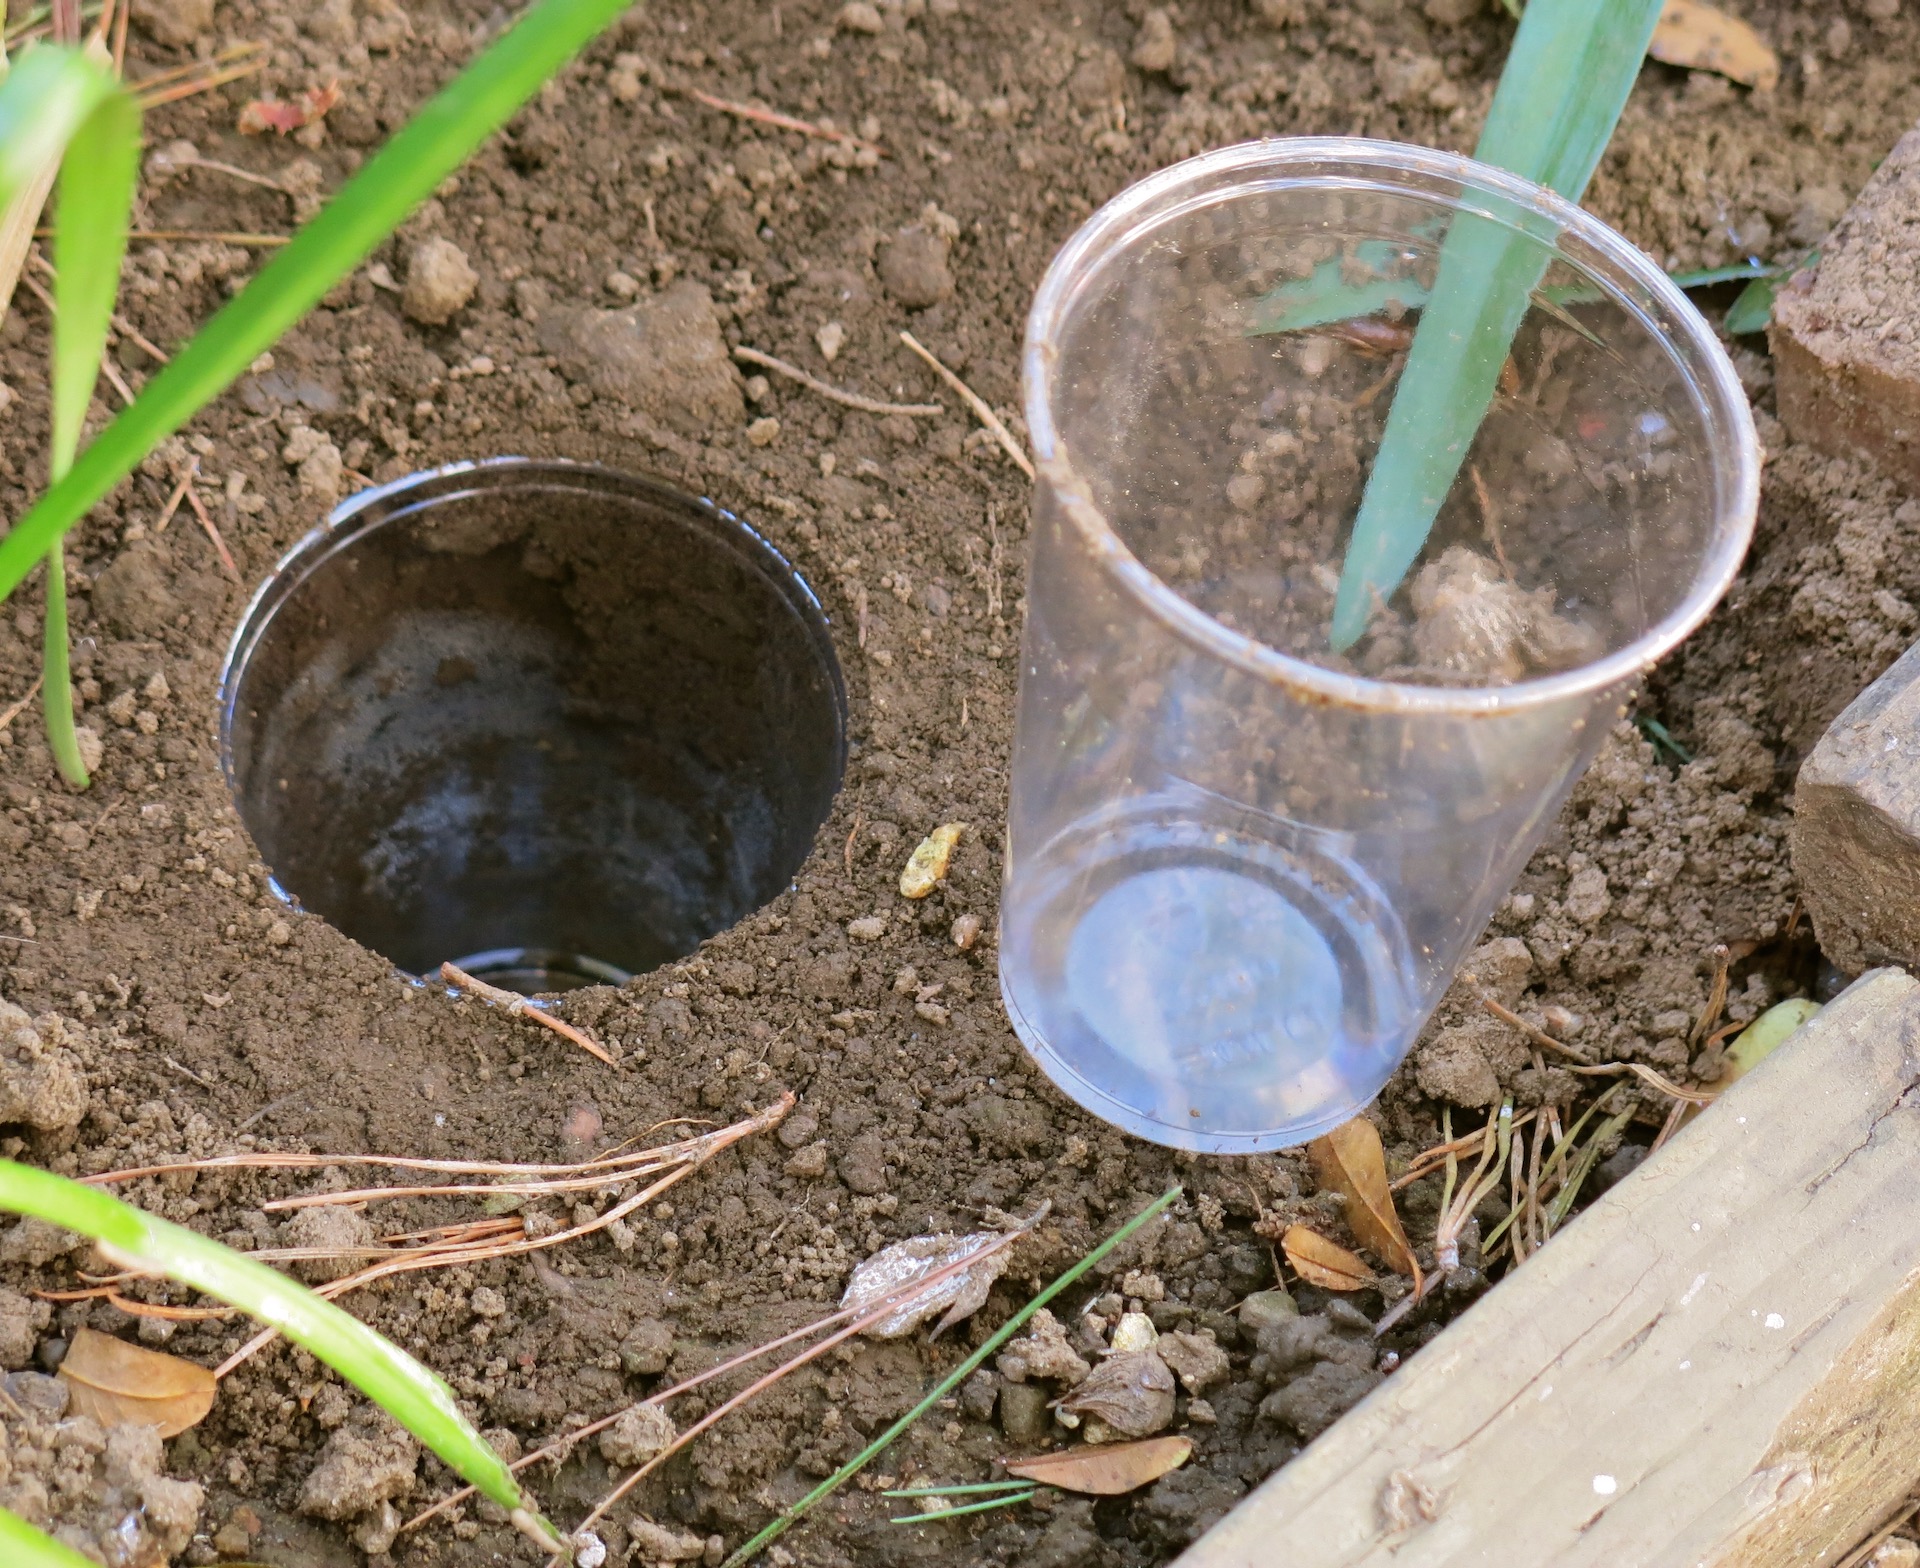
Invertebrate pitfall trap
Some online research revealed that pitfall traps made of glass are most effective (Oecologia 9. VI. 1975, Volume 19, Issue 4, pp 345-357), but the easiest way to make a pitfall trap is with nested plastic drinking cups. You dig a hole deep enough to bury the two nested cups, and pack dirt around them so that the rim of the upper cup is exactly at ground level. Then you can remove the upper cup, dump out all the dirt that fell into it when you were burying it, and then replace it. I used two nested 10-ounce clear plastic drink cups:
To use pitfall traps ethically, you should check them at least once a day, and either release the captured organisms or collect them responsibly. If you’re expecting rain or hot sun, you should place some sort of cover over the trap, raised up an inch or two. The cover will keep rain and sun out, but still allow invertebrates to crawl into the trap. If you’re no longer going to use the trap, pull it out of the ground.
To use this is a weekly class, you have two options: (1) Build the trap one week, then cover it carefully so not even small invertebrates can get in (very hard to do). OR (2) The teachers install the traps the day before, you check them on class day, then remove the trap.
You can have the teens make their own traps in class. BUT you must either (1) take the traps out before the end of class, OR (2) the teachers must check the traps every day. If you install pitfall traps at the very beginning of class, you could check them at the end of class and there might be invertebrates in them.
More about insect pitfall traps.
The handout below has some photos of the kinds of invertebrates you might see.

Session 22: Natural Tie Dying
Find out what plants in your area make good natural dyes. In northern California where Ecojustice class originated, we like to use green cones from Coastal Redwoods. You can also research commercially available natural dyes, such as turmeric.
Also, see this webpage for lots of information on native dyes in California: California native plants to dye for
We have our go-to person who’s our tie-dye expert (thanks, Lorraine!). She helps us run this class.
We like to heat the dye over a rocket stove. But we also use a camp stove, or an open fire in a firepit.
Session 23: Educate the Congregation
Ecojustice Elder:
Wangari Maathai helped educate people about ecojustice issues — both in her role as a college professor, and as a public spokesperson for ecojustice.
Materials:
For posters, you’ll want large paper, paint or colored pencils (we try to avoid markers because they’re disposable plastic), etc.
Session Plan:
See the Standard Lesson Plan for the opening, and the closing.
Have participants make posters that educate the rest of the congregation about a particular environmental issue.
For example, in 2018 the teens decided to educate the congregation about plastics in the environment. At that time, the issue of plastics in the environment had not yet entered popular awareness in the way it did a year or so later. Yet plastics pollution had permeated children and teen pop culture. So this was an excellent topic for the teens to educate the congregation.
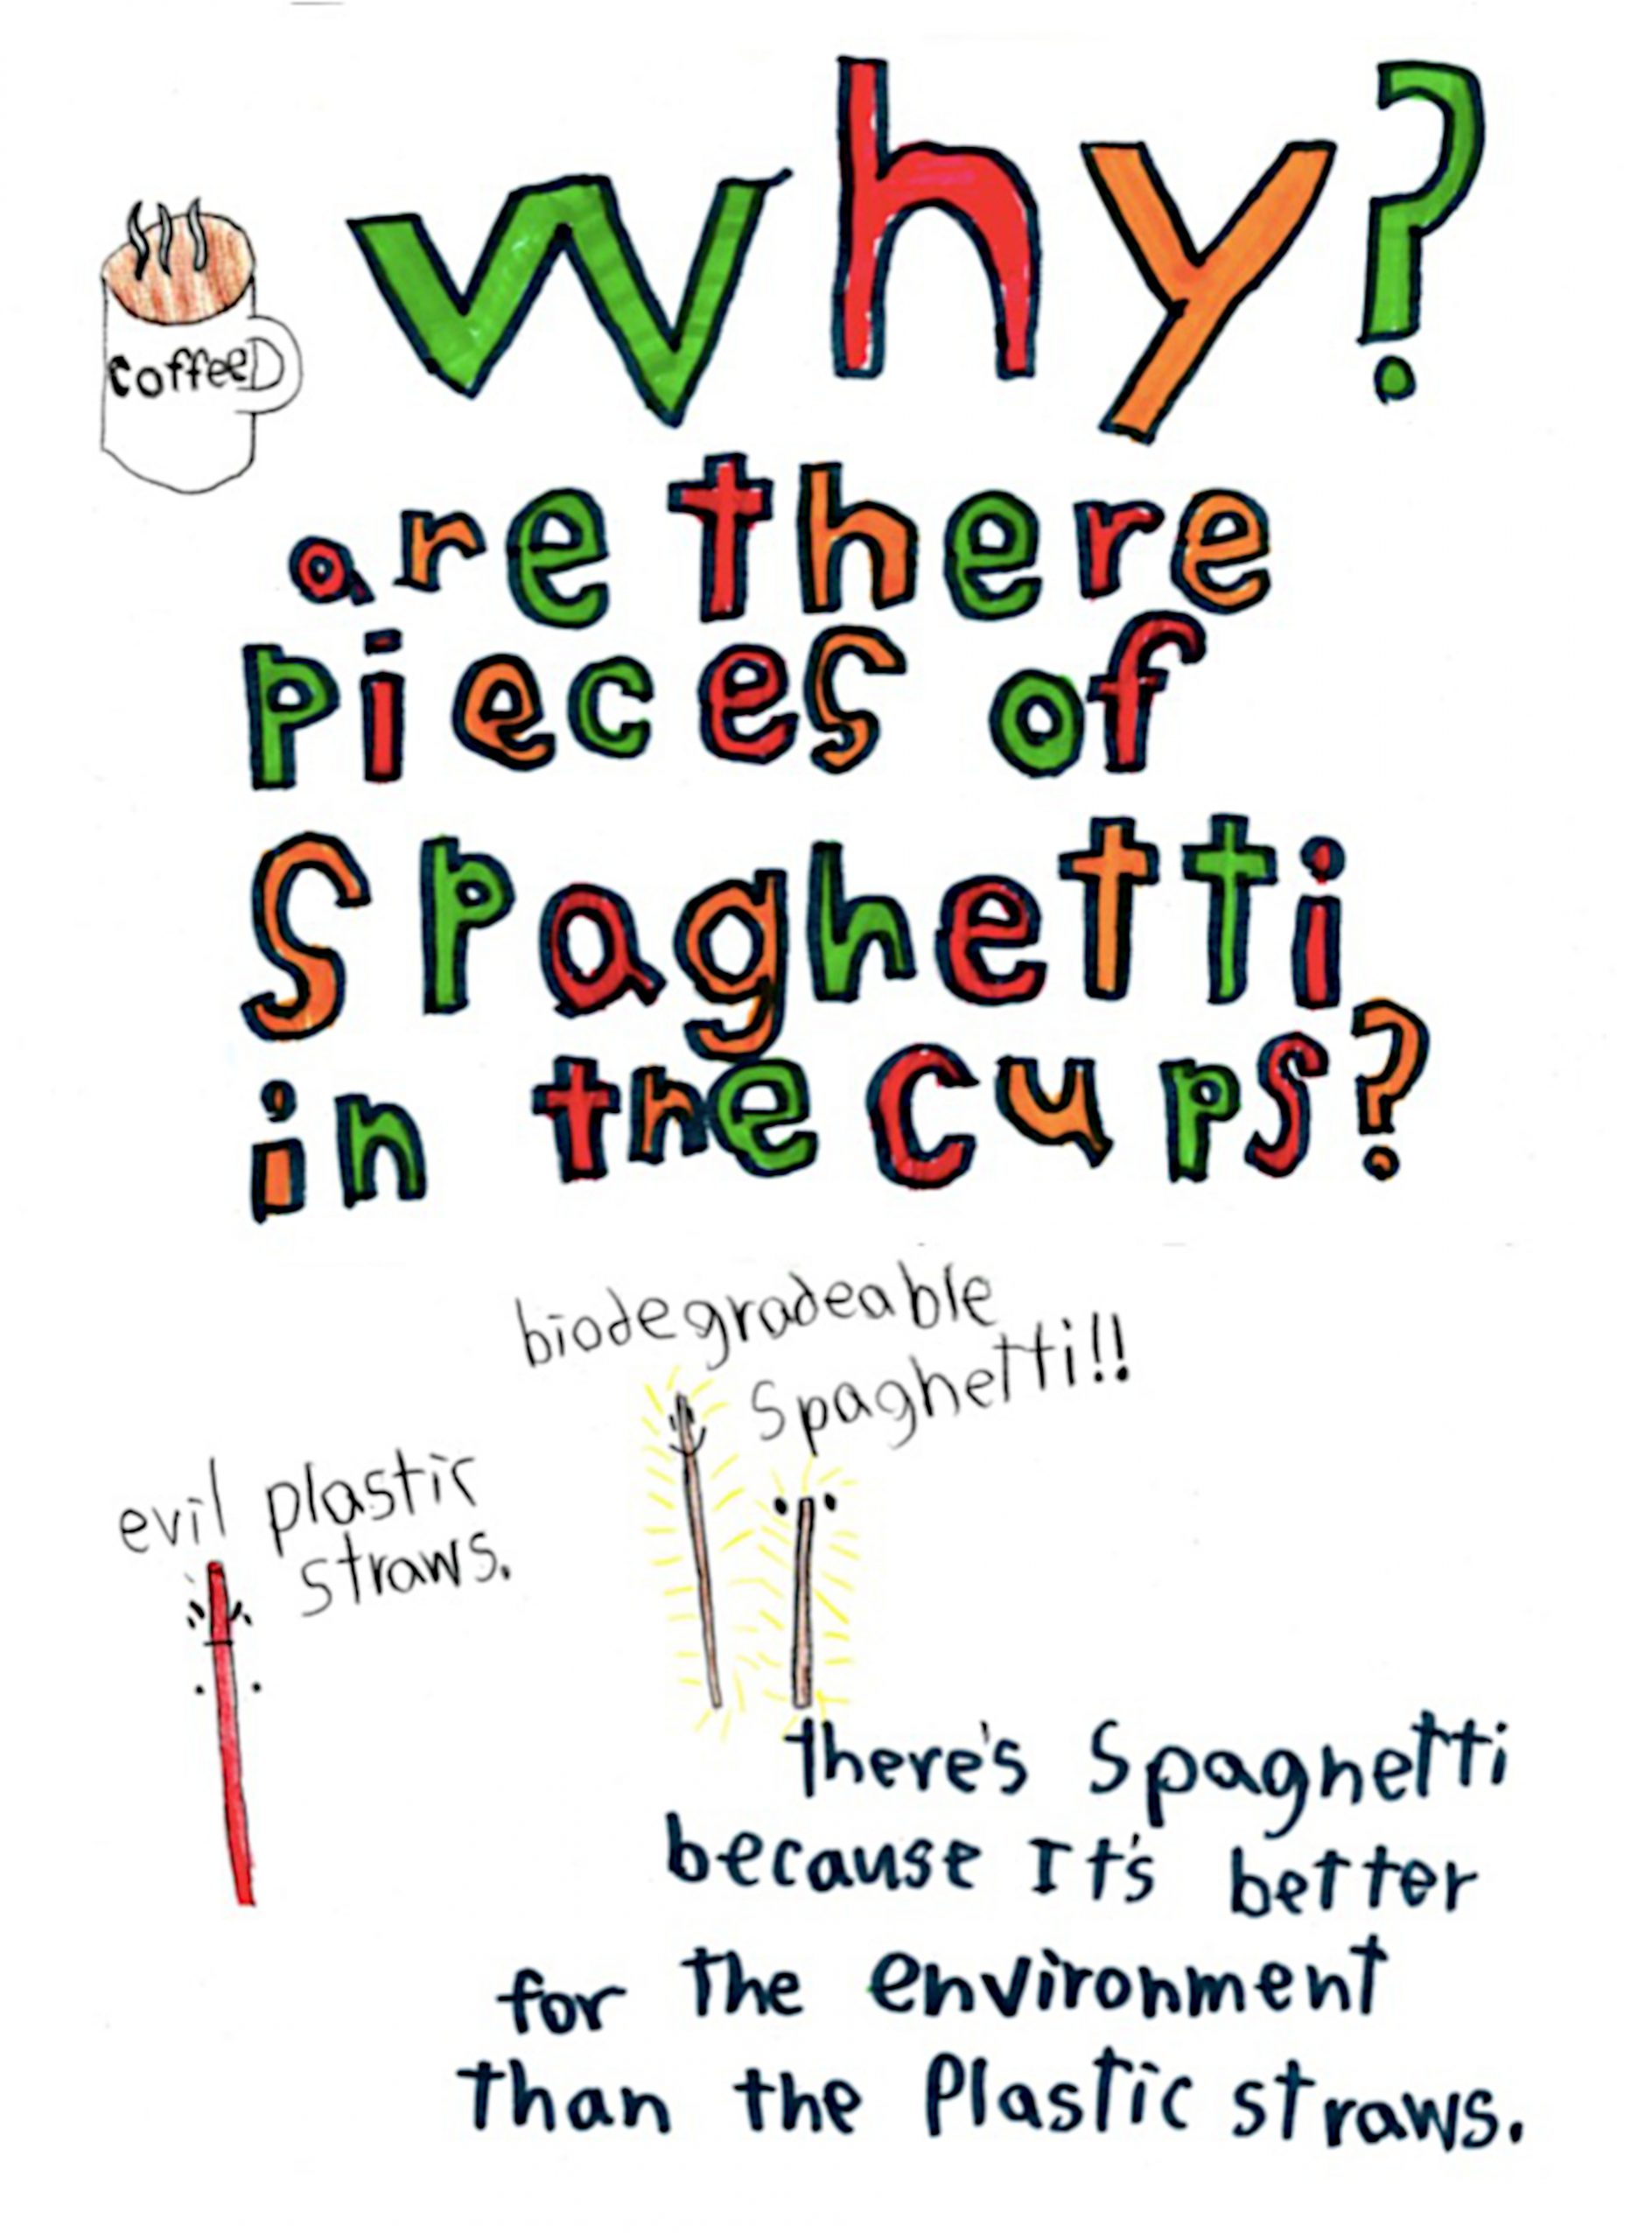
While they focused on posters, they also got broad flat pasta (fettucine) to serve as stirrers for the coffee. The fettucine replaced those horrid single use plastic stirrers (that don’t even work very well). James Kostka made the poster below to tell everyone what the fettucine was for:
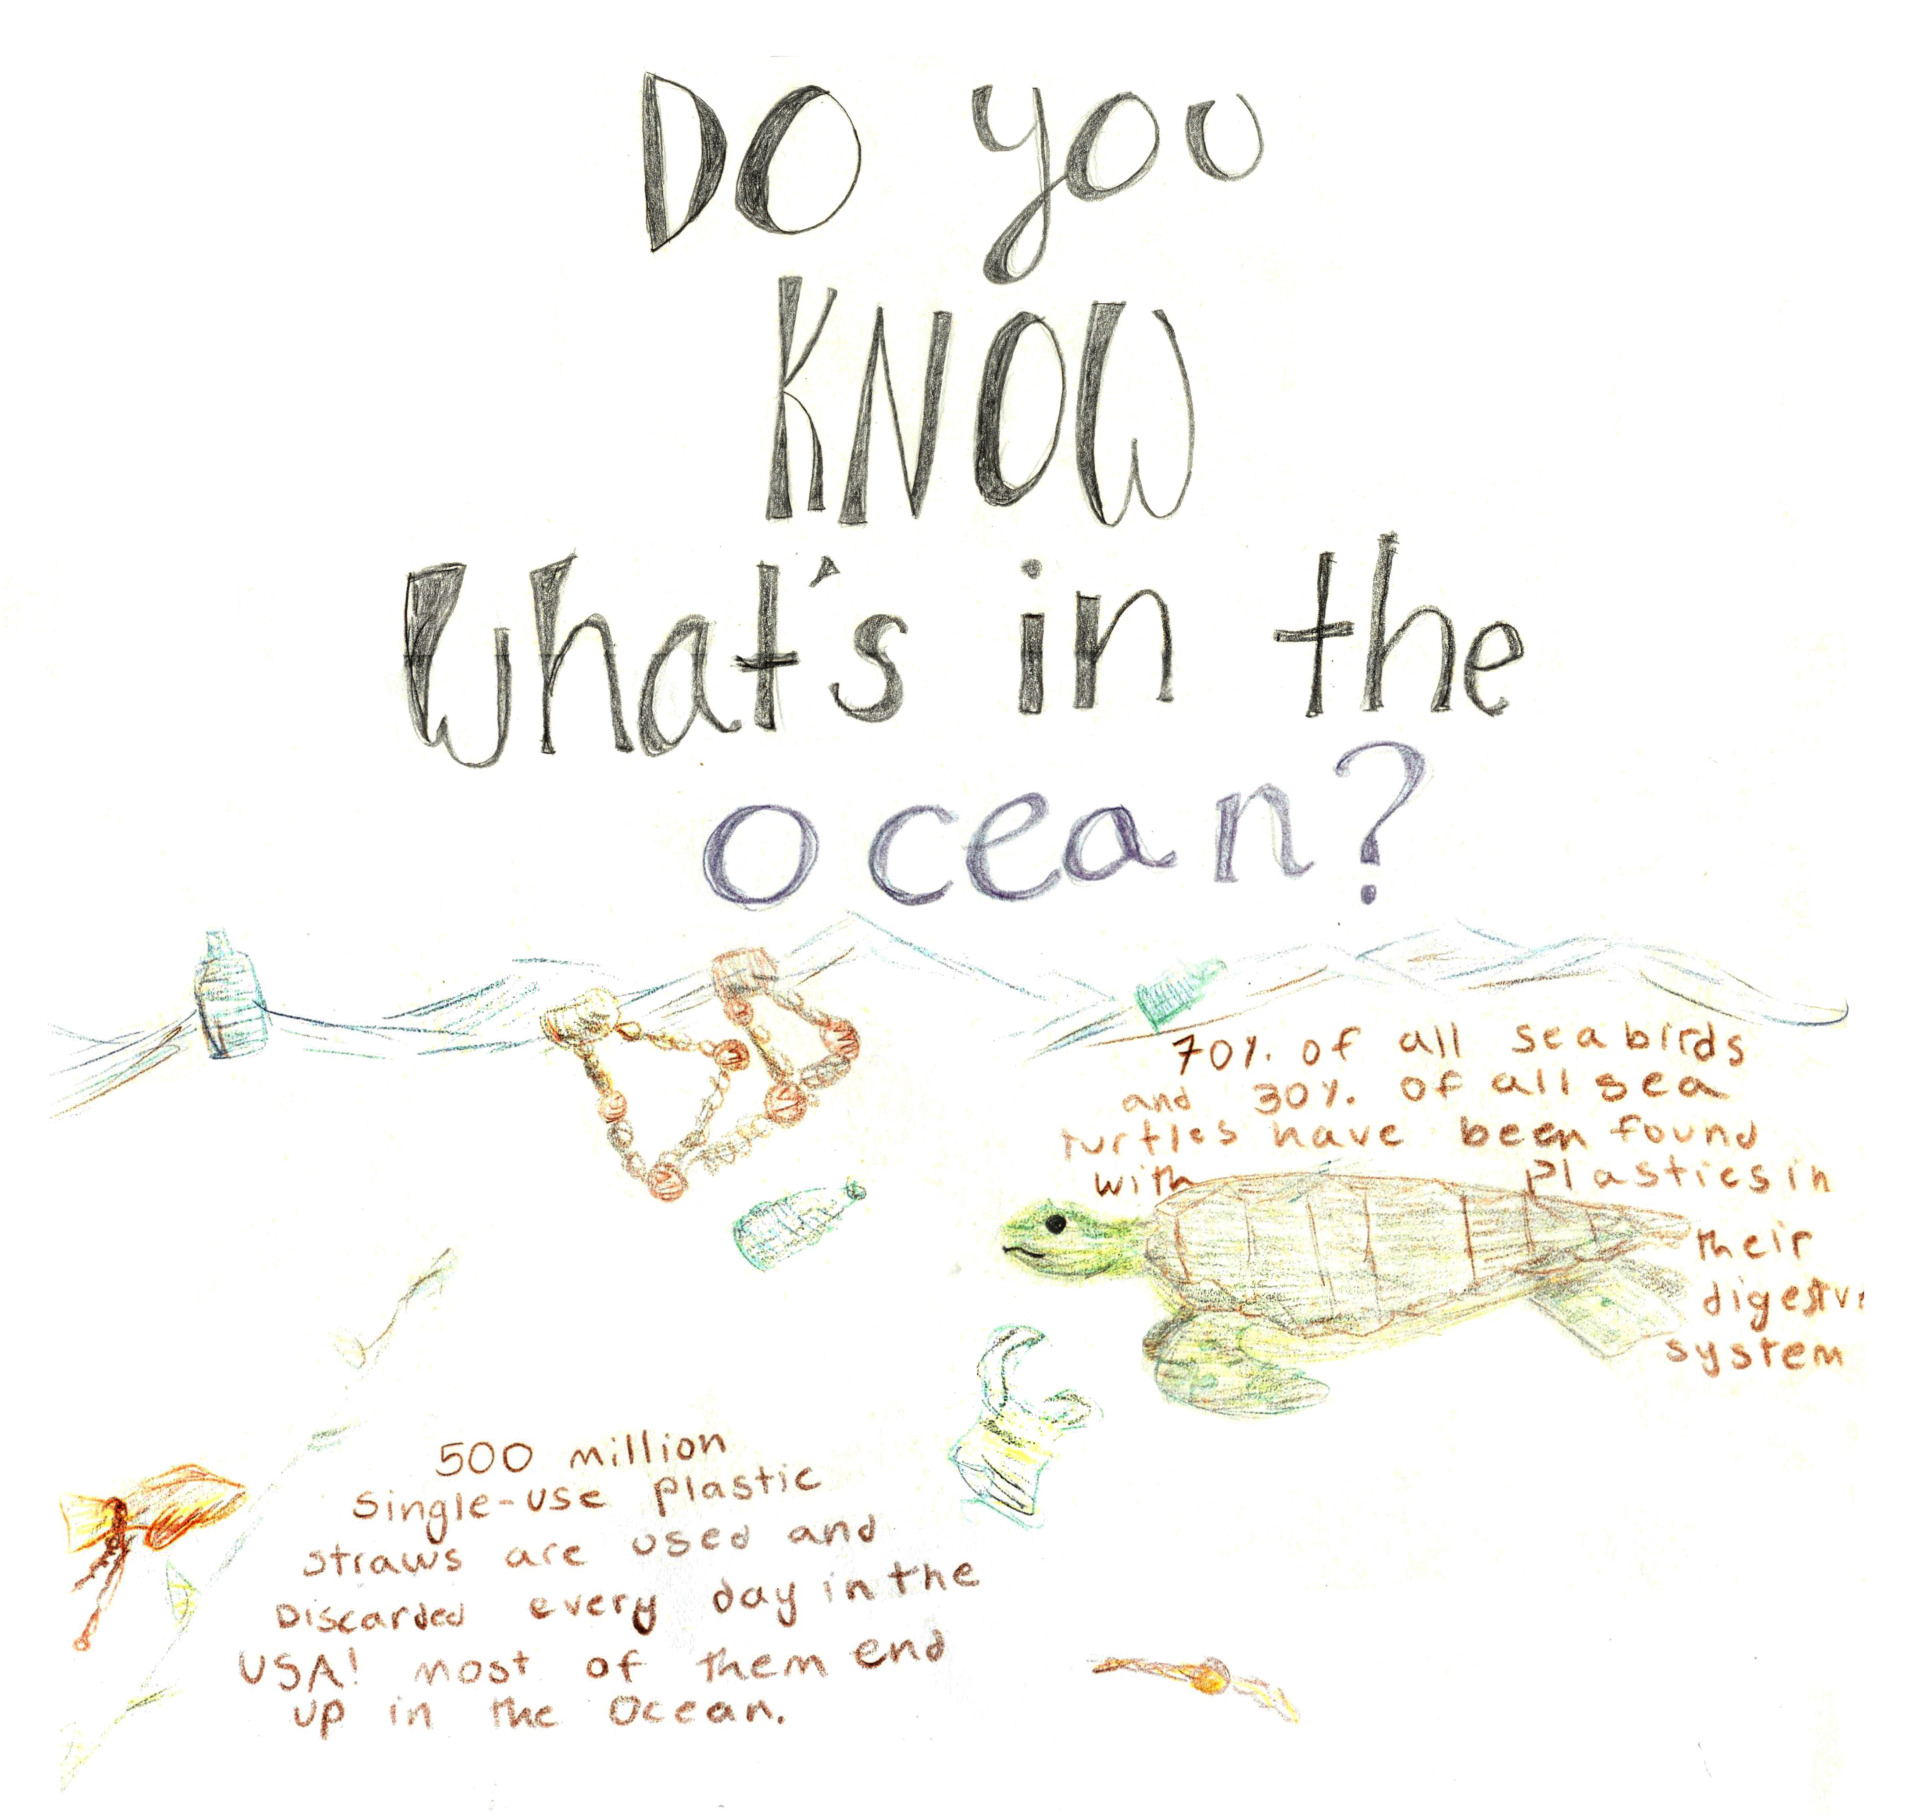
Irene Vail made the poster below to educate the congregation about the dangers of plastic in the environment:
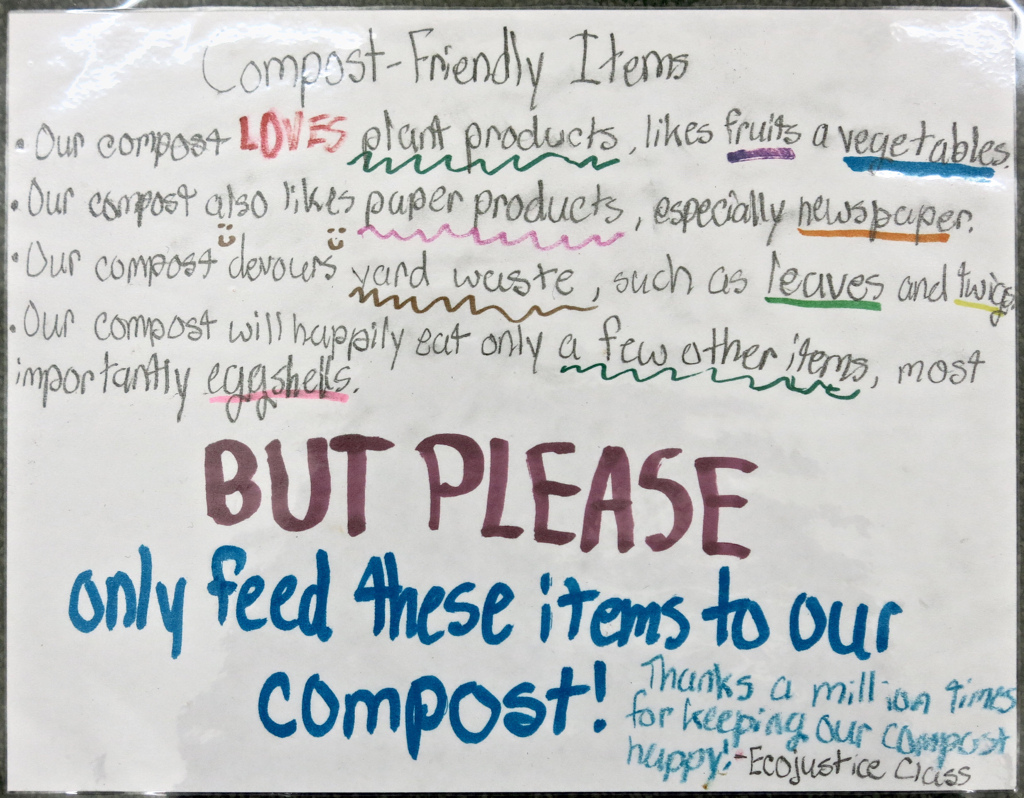
In 2016, Ecojustice Class assembled a tumbling composter. The next week, they made several signs to educate the congregation. They made several signs posted in the church kitchen about saving compostable materials. They also made some signs to post at the composter, so people wouldn’t put the wrong things in it:
Session 24: Pounding Flowers & Dissecting Flowers
These two activities are combined. The emphasis is on pounding flowers. Teens who finish quickly with pounding flowers can go on to dissect flowers.
Materials:
Pounding flowers:
Water color paper (this is important, as regular paper doesn’t work well)
Rubber mallet
A dozen or so fresh flowers, stems, leaves per participant (from florist or garden)
Paper towels
Scissors
Blue painter’s masking tape
Colored pencils (for labeling, messages, or poems if desired)
Dissecting flowers:
One or two flowers per participant (from florist or garden)
Sharp knife, e.g., Xacto knife
Flower anatomy handout
Notes on Flowers:
The fresher the flowers, the better this activity will work. If they’re dried out, they won’t have much juice to be pounded out on the paper.
Even if you’re planning together flowers from a garden / the wild, we’ve found that getting some from a florist can be a good idea, because wild flowers and garden flowers don’t always produce brilliant colors. The point is to have as many different kinds of flowers as possible so you can compare.
White and pale blossoms do not show up well when pounded on white paper!
Prep:
Get fresh flowers from florist in morning
If there are flowers in bloom, gather some before class
Session plan:
See the Standard Lesson Plan for the opening, and the closing.
If you’re going to gather flowers from outdoors, do that first (obviously).
Pounding must be done on a smooth hard surface. A smooth concrete floor works well. Floors covered in linoleum, vinyl tiles, or wood also work well. A very solid table can work, but trying pounding on it with a rubber mallet first to see if the table is sturdy enough.
Note that any pronounced surface texture may affect the outcome (e.g., some wood floors; or textured vinyl floors). Small irregularities in the surface texture can be covered over to some extent by laying down a sheet of heavy paper first.
Method 1:
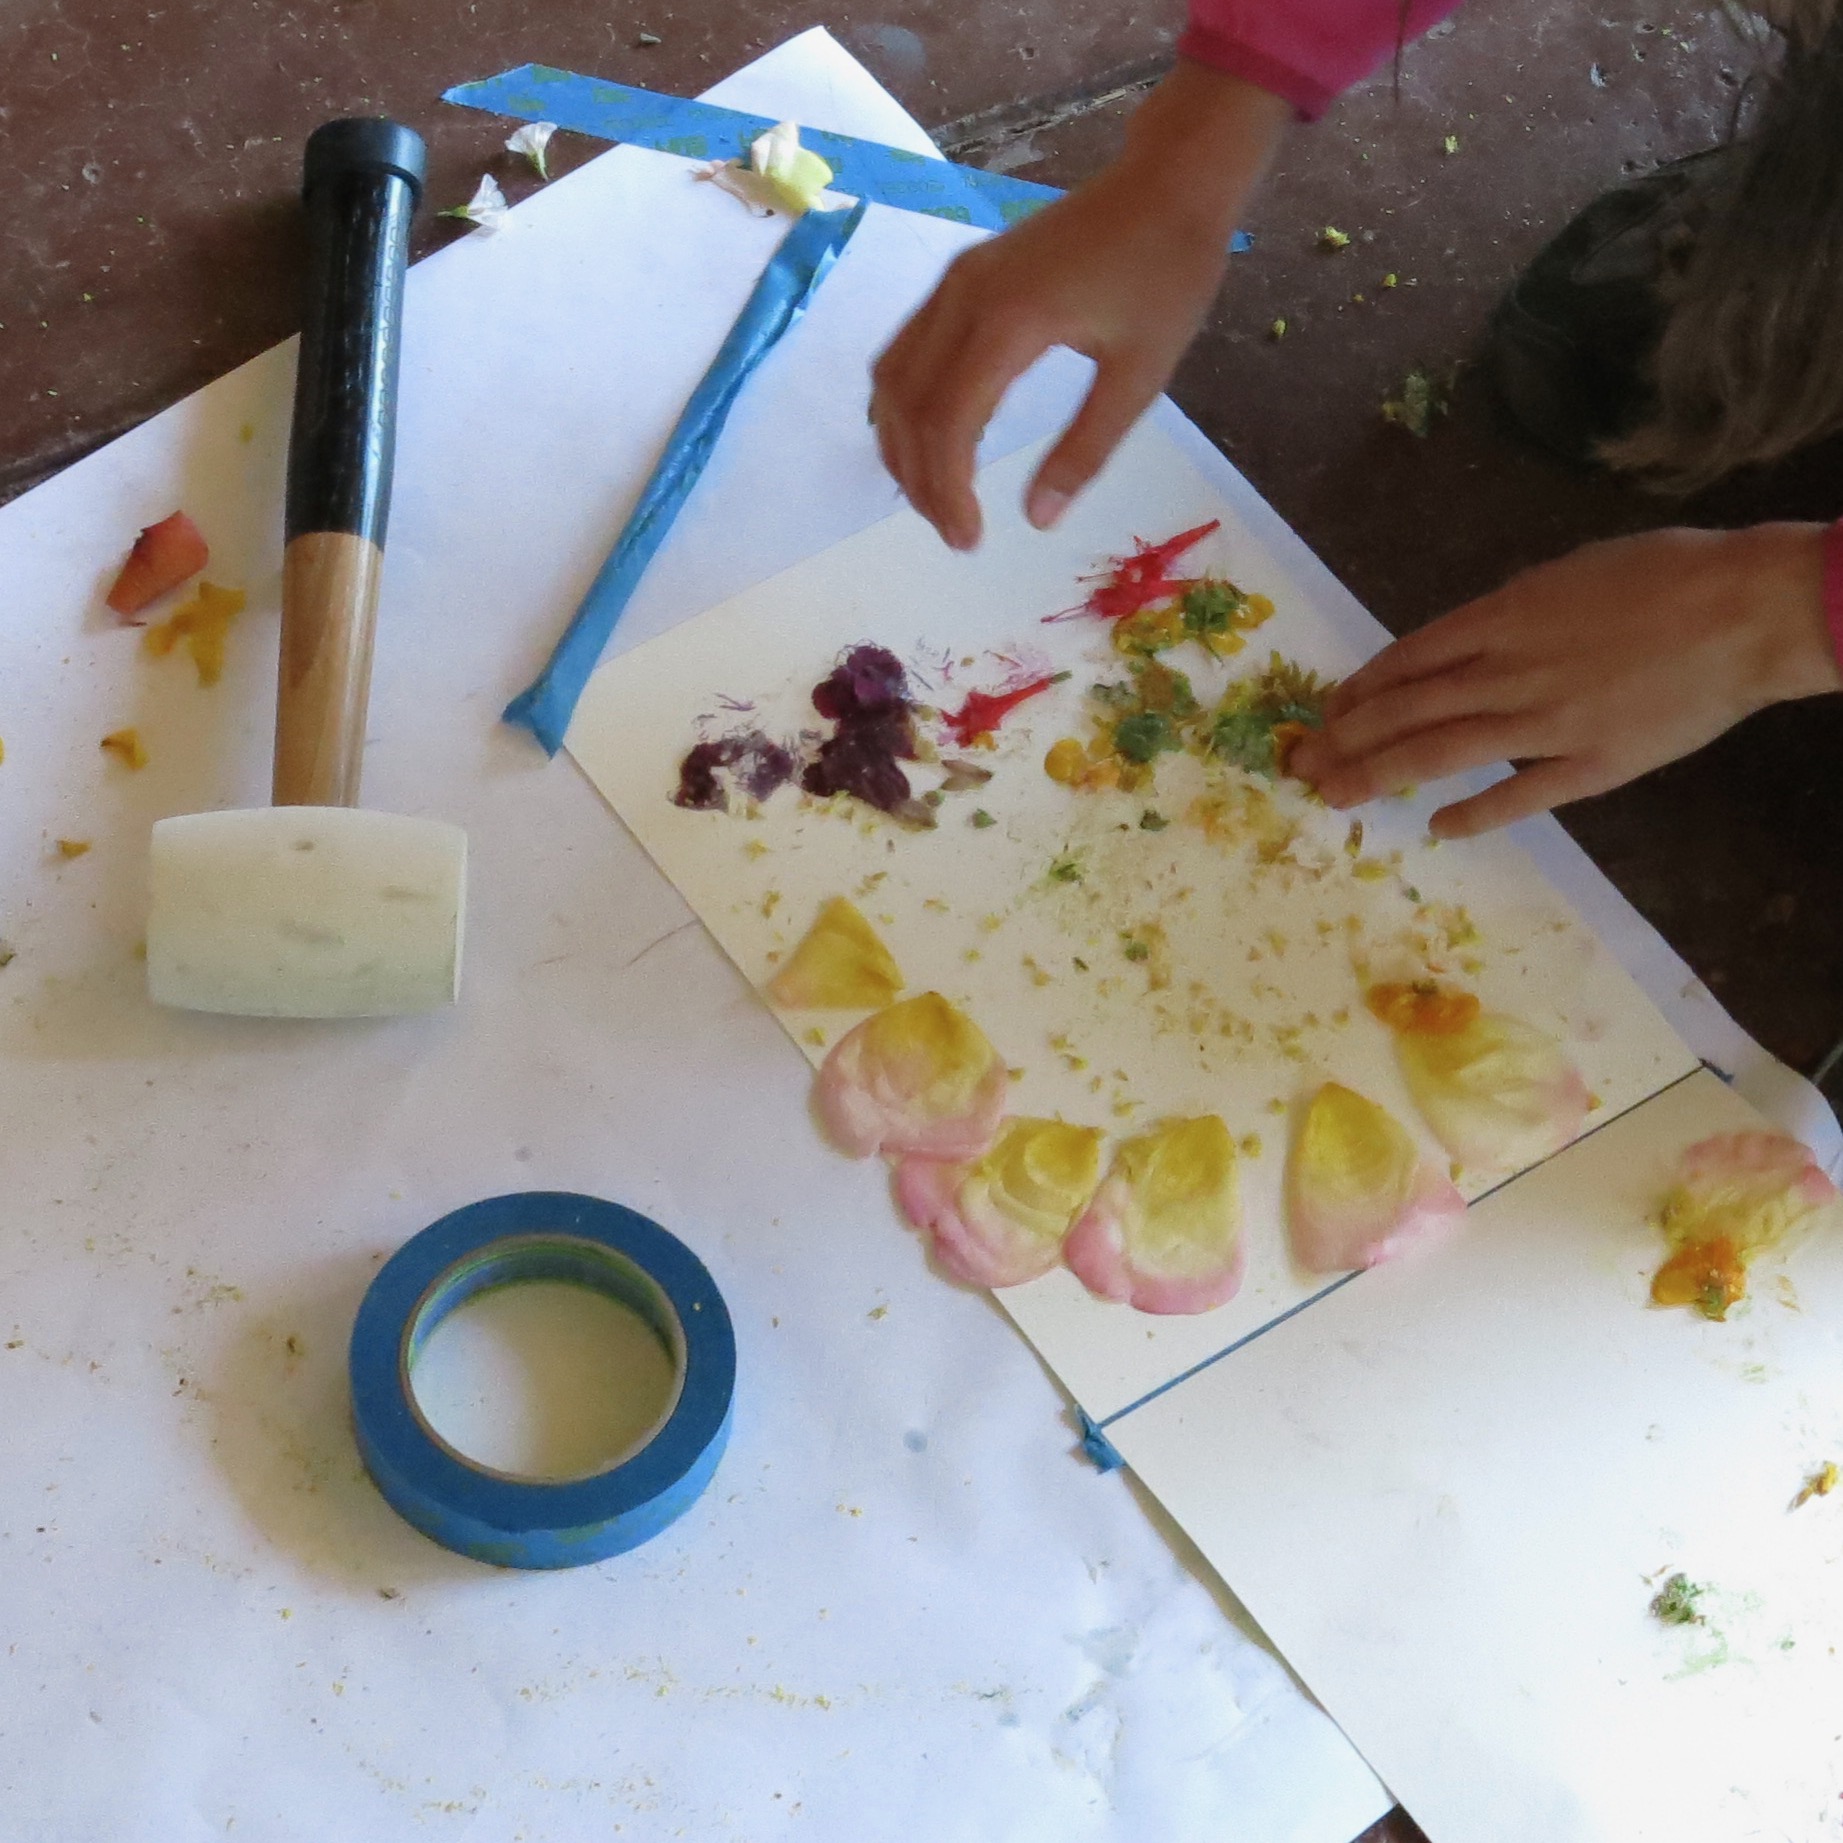
Have each participant lay out 1 sheet water color paper on the ground. Choose one or two flowers and arrange them on paper as they like. Carefully lay paper towels over flowers. Take mallet and pound paper towels as hard as they want. Carefully peel back paper towels, then leftover petals, etc. to see print left on paper.
Method 2:
Tape two sheets of watercolor paper together in a book format, using blue painter’s masking tape. Open the “book.” Arrange the flowers on one sheet. Close the “book.” Pound away. Open the “book” to see the design appear on both pages.
You don’t really get a finished product with this activity. This is more of a sensory awareness activity, designed to get you to look at flowers in a new way. Which flowers had the most vivid dye colors in them? Which flowers were disappointing? Show each other the results of your pounding.
Once they have a sense of which flowers produce what colors, participants often want to pound flowers again. So it’s a good idea to have plenty of flowers.
Dissecting flowers:
Teens who are quickly done with pounding flowers can dissect flowers. The Los Angeles County Arboretum and Botanical Garden has an excellent guide to dissecting flowers, including a handout showing flower parts.
Multiple Sessions
There are several activities that some groups will want to do more than once. Over the years, we’ve found that we get requests for the following activities to either be repeated, or last more than one week:
Fire building (usually 2-3 weeks, as teens practice starting fires)
Cooking (usually not consecutive, but spread out during the year)
Whittling (sometimes 2 weeks required to finish projects)
Gardening (depends on the class; one class devoted many weeks to gardening, but other classes have had no interest)
Games
The Food Chain Game, Interdependence Games, and Migration Headache are simulation games which model ecological concepts. They are really good games. Unfortunately, the first two require more players than we usually have in our Ecojustice Class. The Web of Life Game and Migration Headache each require just 6 players (though they’re better with more players). See also Stealth Games and Trail Signs above.
1. The Food Chain Game
This game requires 15 players. It takes 30+ minutes to play.

2. Web of Life Game
This game requires at least 6 players, 8 or more is better. With 6 players, it takes about 10-15 minutes.

3. Interdependence games
These games require at least ten players. We have played these games for over an hour.

4. Migration Headache
You can play this with as few as 6 players. It takes about 20 minutes.
Link to a PDF with rules for Migration Headache.
Major Projects
Learn more about Ecojustice Class Major Projects.
These projects last for two or more weeks. They typically requires more preparation by teachers, and may require funding to purchase equipment. Yet though these project require more work, they often prove to be what the teens remember most about the class.